
Integrating Azure Active Directory B2C into Xamarin Mobile App
When building mobile apps, it’s often required to add authentication to protect the app’s content. Authentication could be through social identity providers like Facebook, Amazon, LinkedIn, etc or through application based credentials. Azure Active Directory Business to Consumer (Azure AD B2C) provides adding identity management functions into application with little coding.
I will explain how to add customer credentials authentication into Xamarin Forms mobile app targeting iOS and Android using Azure Active Directory B2C:
- Configuring Azure AD B2C tenant
- Create Azure AD B2C tenant
- Register application into the tenant
- Configure sign-up/sign-in policy
- Building Xamarin Forms application
- Empty App
- Welcome Screen
- Sign in/Register
- Secure Page
- Sign out
Configuring Azure AD B2C Tenant
To start using Azure AD B2C, you have to create a new tenant
Create a new directory
- Log in to the Azure portal.
- Click New.
- Click App Services > Active Directory > Directory > Custom create > Create and manage a new Microsoft Azure AD directory.
- Complete the fields of the add directory page:

Register application into the tenant
On the quick start page on the created directory, under Administer, click Manage B2C settings. This will open the new Azure portal.
On the B2C features blade on the Azure portal, click Applications then click Add at the top of the blade and fill the details:
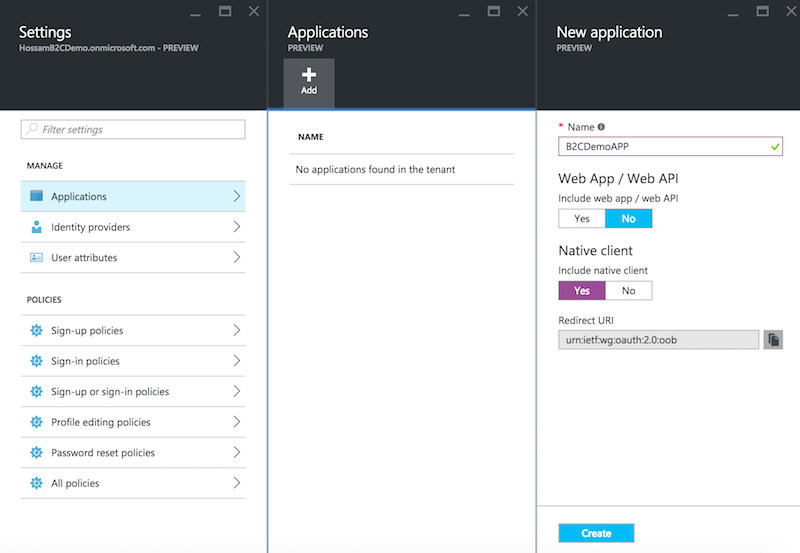
Click Create to register your application and then copy down the globally unique Application Client ID because we will use it later while building the application.

Choose identity providers
Azure AD B2C offers multiple social identity providers Microsoft, Google, Amazon, LinkedIn and Facebook in addition to the local accounts. For the sake of this article, we will keep it to the default identity provider so no need to apply changes.
Configure sign-up/sign-in policy
Policies define the behaviour of sign in, sign up, etc. We will use the unified “Sign-up or Sign-in” policy which will provide the application a single experience for the sign up and sign in. To configure this policy:
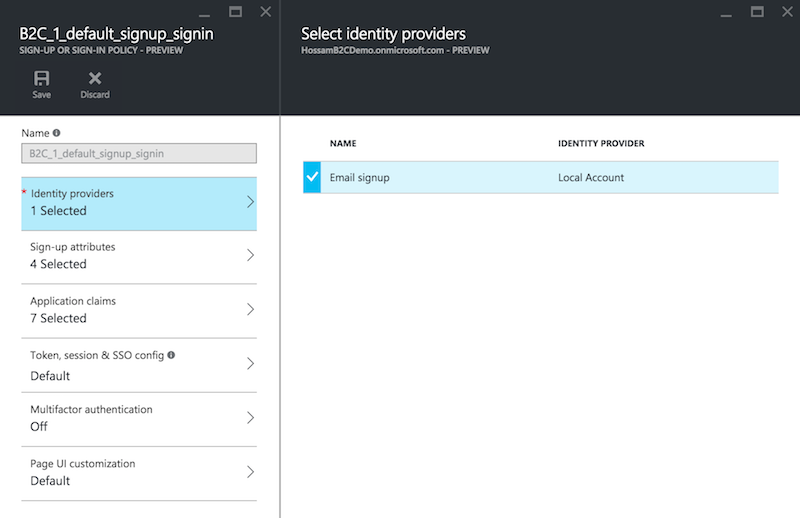
Click on “Sign-up or sign-in policies” > Add > then fill the the details:
- Policy Name: This field defines the name of the policy that we will use in our application.
- Identity Providers: The set of identity providers that will be supported in this policy - in our case it will be “Email signup”.
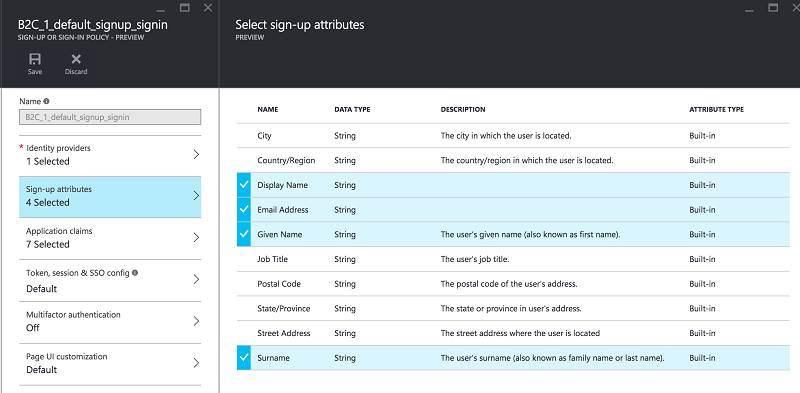
- Sign-up attributes: The set of attributes the user must provide during the registration process.
- Application claims: The claims that will be sent back to the application after the successful log in.

- Multifactor authentication: You can enable Multifactor authentication where the email can use email or mobile to receive confirmation code before proceeding with the login process however we will not use it in this post.
- Page UI customisation: Policies allows customising the look and feel of pages such as sign up and sign in which is basically a CSHTML file.
Now we have finished preparing the AD B2C, let’s jump into building the mobile application.
Building the Xamarin Forms application
We will build Xamarin forms application that targets both iOS and Android platforms. The application will have two screens:
- A Welcome Screen that shows welcome message with sign in button to authenticate the user using Azure AD B2C.
- A Secure Page that shows the logged in user name and sign out functionality.
Empty App
Will start with creating Xamarin Forms app that target both iOS and Android in Xamarin Studio or Visual Studio.
Adding Microsoft Authentication Library
MSAL is a developer library that helps you to obtain tokens from MSA, Azure AD or Azure B2C for accessing protected resources.
MSAL helps you with showing the necessary authentication, multi-factor authentication and consent UX in a platform-appropriate fashion; it takes care of crafting, sending, receiving, validating and interpreting the protocol messages that are required for implementing the authentication flows you need; and it takes care of persisting tokens for you, transparently using all the tricks in the book (such as transparent usage of refresh tokens) to minimize the number of authentication prompts presented to your users.[2]
So, for each project, add a reference to the Microsoft Authentication Library (MSAL) NuGet package and make sure you include the pre-release packages while installing.
Android Special Handling
We have to update the OnActivityResult of the MainActivity in the Android project with the line of code below to ensure the control goes back to MSAL once the interactive portion of the authentication flow ended:
AuthenticationAgentContinuationHelper.SetAuthenticationAgentContinuationEventArgs(requestCode, resultCode, data);
protected override void OnActivityResult(int requestCode, Result resultCode, Intent data)
{
    base.OnActivityResult(requestCode, resultCode, data);
    AuthenticationAgentContinuationHelper.SetAuthenticationAgentContinuationEventArgs(requestCode, resultCode, data);
}
Welcome Screen
Moving into adding the welcome screen, add new Xamarin forms Xaml content page with the name WelcomePage and update the Xaml:
<StackLayout Orientation="Vertical" VerticalOptions="FillAndExpand">
    <Label Text="Welcome to Xamarin Forms!" VerticalTextAlignment="Center" VerticalOptions="FillAndExpand" HorizontalOptions="Center" />
    <StackLayout Orientation="Horizontal" VerticalOptions="End" HorizontalOptions="CenterAndExpand">
        <Button Text="Sign In" x:Name="SignIn" Clicked="OnSignUpSignIn_Clicked" HorizontalOptions="Center"/>
    </StackLayout>
</StackLayout>
We will navigate between welcome screen and secure page so update the constructor inside the file app.xaml.cs:
public App()
{
    InitializeComponent();
    MainPage = new NavigationPage(new WelcomePage());
}
The MSAL requires set of parameters so I will create class AuthParameters with all the required parameters and will initiate them with the values from the previous steps:
public class AuthParameters
    {
        public const string Authority = "https://login.microsoftonline.com/HossamB2CDemo.onmicrosoft.com/";
        public const string ClientId = "1aa3e632-bd72-4040-8d4a-854242bd4f20";
        public static readonly string[] Scopes = { ClientId };
        public const string Policy = "B2C_1_default_signup_signin";
    }
The welcome screen will redirect the user to the secure page whenever there is a stored token, so we will update the WelcomePage.OnAppearing:
try
{
    PublicClientApplication publicClientApplication = new PublicClientApplication(AuthParameters.Authority, AuthParameters.ClientId);
    var authResult = await publicClientApplication.AcquireTokenSilentAsync(AuthParameters.Scopes, "", AuthParameters.Authority, AuthParameters.Policy, false);
    await Navigation.PushAsync(new SecurePage());
}
catch
{

}
I am using the main class in MSAL PublicClientApplication trying to retrieve any stored token by calling the method AcquireTokenSilentAsync. AcquireTokenSilentAsync throughs an exception if no token found so we have to wrap our code with try catch. if the call succeeds, we redirect the user to the SecurePage.
Sign in/Register
Add the sign in click button handler:
async void OnSignUpSignIn_Clicked(object sender, EventArgs e)
{
    try
    {
        PublicClientApplication publicClientApplication = new PublicClientApplication(AuthParameters.Authority, AuthParameters.ClientId);
        publicClientApplication.PlatformParameters = PlatformParameters;
        var authResult = await publicClientApplication.AcquireTokenAsync(AuthParameters.Scopes, "", UiOptions.SelectAccount, string.Empty, null, AuthParameters.Authority, AuthParameters.Policy);
        await Navigation.PushAsync(new SecurePage());
    }
    catch (Exception exception)
    {
        await DisplayAlert("An error has occurred", exception.Message, "Dismiss");
    }
}
The code is similar to the one we have used to acquire the token inside OnAppearing of the WelcomePage however there are two differences:
AcquireTokenAsync: This method will get the user into the interactive mode of showing web view, to sign up or sign in. The functionalities that appear inside the web view, are mainly derived from the policy configurations which gives more flexibility like enabling multi-factor authentication at any time or adding extra attribute to the user profile.PlatformParameters: This parameter helps the MSAL to detect which platform is currently in use so it can correctly handle the interactive mode and the value for this parameter must be set through each platform so we have to update theWelcomePageto contain public variable that we set through a renderer inside each platform.
Setting Platform Parameters
Add the public property PlatformParameters to the WelcomePage:
public IPlatformParameters PlatformParameters { get; set; }
Then, create WelcomePageRender inside the iOS project:
[assembly: ExportRenderer(typeof(WelcomePage), typeof(WelcomePageRenderer))]
namespace B2CDemo.iOS
{
    class WelcomePageRenderer : PageRenderer
    {
        WelcomePage page;
        protected override void OnElementChanged(VisualElementChangedEventArgs e)
        {
            base.OnElementChanged(e);
            page = e.NewElement as WelcomePage;
        }
        public override void ViewDidLoad()
        {
            base.ViewDidLoad();
            page.PlatformParameters = new PlatformParameters(this);
        }
    }
}
And, another renderer inside the Android project:
[assembly: ExportRenderer(typeof(WelcomePage), typeof(WelcomePageRenderer))]
namespace B2CDemo.Droid
{
    class WelcomePageRenderer : PageRenderer
    {
        WelcomePage page;

        protected override void OnElementChanged(ElementChangedEventArgs<Page> e)
        {
            base.OnElementChanged(e);
            page = e.NewElement as WelcomePage;
            var activity = this.Context as Activity;
            page.PlatformParameters = new PlatformParameters(activity);
        }
    }
}
Secure Page
This page will show the current user name so update the OnAppearing:
protected async override void OnAppearing()
{
    try
    {
        PublicClientApplication publicClientApplication = new PublicClientApplication(AuthParameters.Authority, AuthParameters.ClientId);
        var authResult = await publicClientApplication.AcquireTokenSilentAsync(AuthParameters.Scopes, "", AuthParameters.Authority, AuthParameters.Policy, false);
        Token.Text = authResult.IdToken;
        Name.Text = "Welcome Secure User:" + authResult.User.Name;

    }
    catch(Exception ex)
    {
        //failed to retrieve token
        PublicClientApplication publicClientApplication = new PublicClientApplication(AuthParameters.Authority, AuthParameters.ClientId);
        publicClientApplication.UserTokenCache.Clear(AuthParameters.ClientId);
        await Navigation.PushAsync(new WelcomePage());
    }
}
The code is very similar to the one that we have used in the welcome screen with the addition of grabbing the user name from the result using result.User.Name
You can use authResult.IdToken to acquire the Access Token to call any secured APIs.
Sign out
The sign out is easy, all we need to do is remove the access token from the cache and then navigate the user to the welcome screen:
async void SignOut_Clicked(object sender, System.EventArgs e)
{
    PublicClientApplication publicClientApplication = new PublicClientApplication(App.Authority, App.ClientId);
    publicClientApplication.UserTokenCache.Clear(App.PCApplication.ClientId);
    await Navigation.PushAsync(new WelcomePage());
}
Here, you should be able to run the application with all the functionalities working.